

docs
Ocean Protocol's official documentation.
Content
The documentation is split in multiple sections whose content lives in this repo:
- Core concepts: high-level explanation of concepts, assumptions, and components
- Setup: getting started for various stakeholders and use cases
- Tutorials: detailed tutorials
- API References: docs for the Aquarius & Brizo REST APIs, and docs for various Squid libraries
Those sections are defined in the /data/sections.yml file.
Content Files
Some content files live in the /content & /data folders, and is written using Markdown and YAML.
That content is organized into subfolders corresponding to the sections mentioned above. The subfolder names, along with the filenames, define the final URL of a given piece of content.
The final navigational organization of the content is driven through the sidebar files under /data/sidebars.
Some global values used throughout the site can be set in config.js.
External Content Files
Additionally, some content files live in other repositories and are maintained there. They are pulled into Gatsby's data layer at build time, and pages are created automatically for them as defined in gatsby-node.js.
At the moment, this is set up for the following repositories:
For including a document from any of the above repositories, 4 values are required in a document's YAML frontmatter. If found, a page will be generated automatically, accessible under the defined slug.
This will NOT include this page in the doc's sidebar navigation, this needs to be done manually in the docs repo in one of the sidebar files. This is so you can check out everything before exposing it to visitors, and to ensure editorial workflow of the categorization.
Markdown File Requirements
All Markdown files should use
GitHub Flavored Markdown and must satisfy some extra requirements:
- The file must begin with a section called YAML frontmatter that looks like this:
---
title: This is the Title in Title Case
description: A short description of the page.
---

Markdown content begins here.
For external documents in other repos, defining the slug and section is required:
---
title: This is the Title in Title Case
description: A short description of the page.
slug: /concepts/architecture/
section: concepts
---

Markdown content begins here.
Note: The description value will be rendered on-page below the title, and it will also be used for description tags in the HTML head.
- Don't include the page title or description in the Markdown section. That is, don't begin the Markdown content with
# This is the Title in Title Case. Just write as if that were already there. - start your heading levels with
h2, so## My heading - Internal links to other docs pages should be:
- to a absolute URL without the host, that looks like
/concepts/terminology/with slashes on the beginning and end, and with no.mdor.htmlat the end (before the last slash). - when linking from external repos, to the full absolute URL, such as
https://docs.oceanprotocol.com/hello/you-are-awesome/
- to a absolute URL without the host, that looks like
- no TOC please, this will be generated automatically from all headings
- for images and media, you can keep them in the original repo. Images will be automatically grabbed by the docs site on querying. When doing that, docs site will generate all sorts of image sizes to handle proper responsive images, so no need to keep an eye on image dimensions or file sizes
Have a look at docs.oceanprotocol.com/test/ to see what content elements can be used in all Markdown files included in docs site.
Adding Docs
- Add new Markdown file under one of the folders under
/content - Add new path to one of the sidebars in
/data/sidebars - Push your changes to a new branch in the repo, or in your fork
- Open a pull request against
master, automatically asking for review - Wait for review, possibly make requested changes
- Wait for all checks to pass
- Merge!
Editing Docs
Every article on docs.oceanprotocol.com ends with an Edit this page on GitHub link. Clicking that will put you to the right place in the repository from where you can hit the Edit pencil icon on GitHub.
GitHub will automatically fork the repository if you are not part of the oceanprotocol organisation on GitHub. Members can simply push to a new branch on the original repo.
The editing workflow is as follows:
- Make your changes
- Push your changes to a new branch in the repo, or in your fork
- Open a pull request against
master, automatically asking for review - Wait for review, possibly make requested changes
- Wait for all checks to pass
- Merge!
Repositories
Includes a repository component which can be used throughout the site and in all Markdown documents.
On the front page it is used to show an overview of all our key repositories. This repositories list is sourced from the /data/repositories.yml file, defining the grouping, the display order, which repos to include, and what additional links to show for every repository.
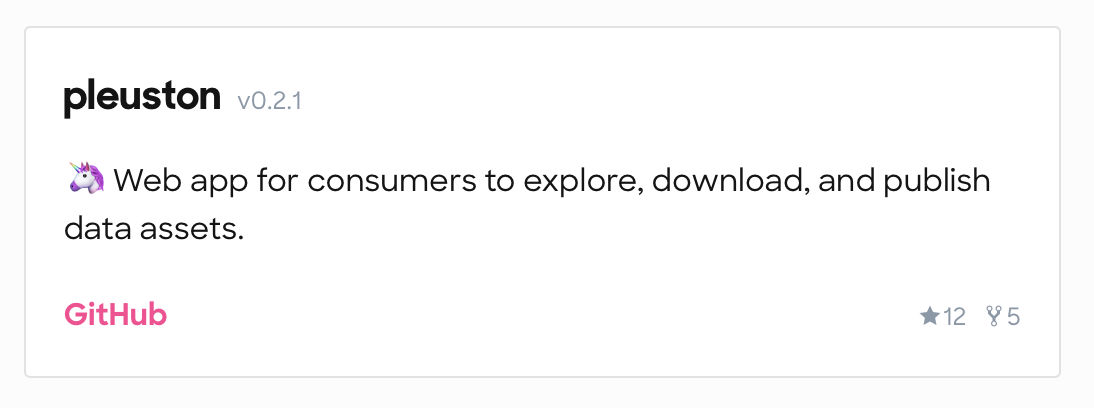
Including a repo on the front page requires only the name key and value, and it needs to be exactly the same as the repo name on GitHub:
- name: pleuston
Additional information about a repo will then be fetched automatically from GitHub. The above example will result in:
This repository component can also be used within any Markdown content like so:
<repo name="pleuston"></repo>
You can also add a private repo to prepare for a release, it will show up as soon as it is made public on GitHub.
Add Links to a Repository
You can attach multiple links to a repo by attaching them to the respective repo in the /data/repositories.yml file:
- name: keeper-contracts
  links:
    - name: Documentation
      url: https://github.com/oceanprotocol/keeper-contracts/tree/develop/doc
    - name: TCR Owner's Manual
      url: https://github.com/oceanprotocol/keeper-contracts/blob/develop/doc/owners_manual.md
The GitHub link is automatically added for every repository and will always be displayed.
Release Versions
The displayed version number is based on the tag name of the latest release for a given repository. That means only GitHub releases will trigger a version number update, creating a new Git tag alone is not sufficient.
API References
You can add more Markdown documents under /content/references/, link to them from the /data/sidebars/references.yml, and they will appear just like in all the other sections.
But the actual reference pages in this section are constructed from data files during site build (as defined in gatsby-node.js) with their own little rules. Generally, you can't edit their content within this site, you have to go to the respective repository and edit the documentation strings living with the source code.
The sidebar for those generated reference pages will automatically switch to include the table of contents of those pages so no need to define additional links in the /data/sidebars/references.yml file for them.
Swagger specs
Reference pages based on Swagger specs are sourced from remotely hosted Swagger specs:
They are fetched and updated automatically upon every site build. For more information about stylistic issues, take a look at the section in the test page:
TypeDoc specs
Reference pages based on generated json file from TypeDoc. TypeScript-based projects are included as git submodules under ./external.
On site build, TypeDoc will automatically generate the required json spec file into ./data/squid-js.json and create pages from it. The data from these json files is then used by the TypeDoc template.
To update the specs to the most recent version, the ./external/squid-js submodule needs to be manuall updated. That's it, on next site build a new spec will be used.
Development
The site is a React app built with Gatsby.
This Git repo has Git submodules. They are the subdirectories of external/. Each one is basically another Git repo, i.e. an external Git repo that just looks like it's part of this Git repo. It's very easy to get Git into a confusing state when there are submodules. If you follow the following tips, you should probably be okay:
-
Clone this repo using:
git clone --recurse-submodules [email protected]:oceanprotocol/docs.git -
Don't edit anything in the submodules (i.e. in
external/). Instead, edit it over in the other Git repository and merge your changes over there. -
Get all the submodules up-to-date using:
git submodule update --remote --recursiveThat will get each submodule up-to-date with the HEAD commit of some branch in a remote repository. Which branch? That's set in the
.gitmodulesfile. You can check the current commit hashes of all the submodules usinggit submodule status -
Before doing any
git checkout ...or other normal Git operations, do this:git config --global submodule.recurse trueThat's like adding the
--recurse-submodulesoption to all those Git commands (except forgit clone) so you don't have to.
Using npm
As a prerequisite, you'll need the following on your machine:
- Node.js
- npm
- Your
GITHUB_TOKEN, see GitHub GraphQL API
Clone this repo, install all dependencies, and start the development server:
git clone --recurse-submodules [email protected]:oceanprotocol/docs.git
cd docs/

# add GITHUB_TOKEN
cp .env.sample .env
vi .env

npm i
npm start
This will start a hot-reloading local server exposed under localhost:8000.
Using Docker
Alternatively, you can use Docker for which you need to have installed on your machine:
- Docker
- Docker Compose
- Your
GITHUB_TOKEN, see GitHub GraphQL API
Then use Docker Compose to bring everything up:
git clone --recurse-submodules [email protected]:oceanprotocol/docs.git
cd docs/

# add GITHUB_TOKEN
cp .env.sample .env
vi .env

docker-compose up
This will expose a hot-reloading server under localhost:8000.
Linting & Formatting
To enforce a consistent code style, linting is setup for pretty much every file. Linting is part of the test suite, meaning builds on Travis will fail in case of linting errors.
In this repo the following tools are setup for that:
- ESLint with eslint-config-oceanprotocol
- Stylelint with stylelint-config-bigchaindb
- markdownlint
- Prettier
# only run linting checks
npm run lint

# auto-formatting of all js, css, md, yml files
npm run format
Editor Setup: VS Code
If you use VS Code as your editor, you can install those extensions to get linting as you type, and auto-formatting as you save:
GitHub Data Fetching
Currently, there are three ways of getting data from GitHub to construct various parts of the docs site:
- as external content files via Git submodules of selected repos, on build time
- via GitHub's GraphQL API v4, on build time
- via GitHub's FETCH API v3, on run time
GitHub GraphQL API
The GitHub GraphQL API integration is done through gatsby-source-graphql and requires authorization.
An environment variable GITHUB_TOKEN needs to present, filled with a personal access token with the scope public_repo.
For local development, you can simply create a personal access token and use it in your local .env file:
cp .env.sample .env
vi .env
# GITHUB_TOKEN=add_your_token_here
When running the site locally, you can use the GraphiQL client running under localhost:8000/___graphql to explore the whole GraphQL layer of the site (not just the GitHub infos).
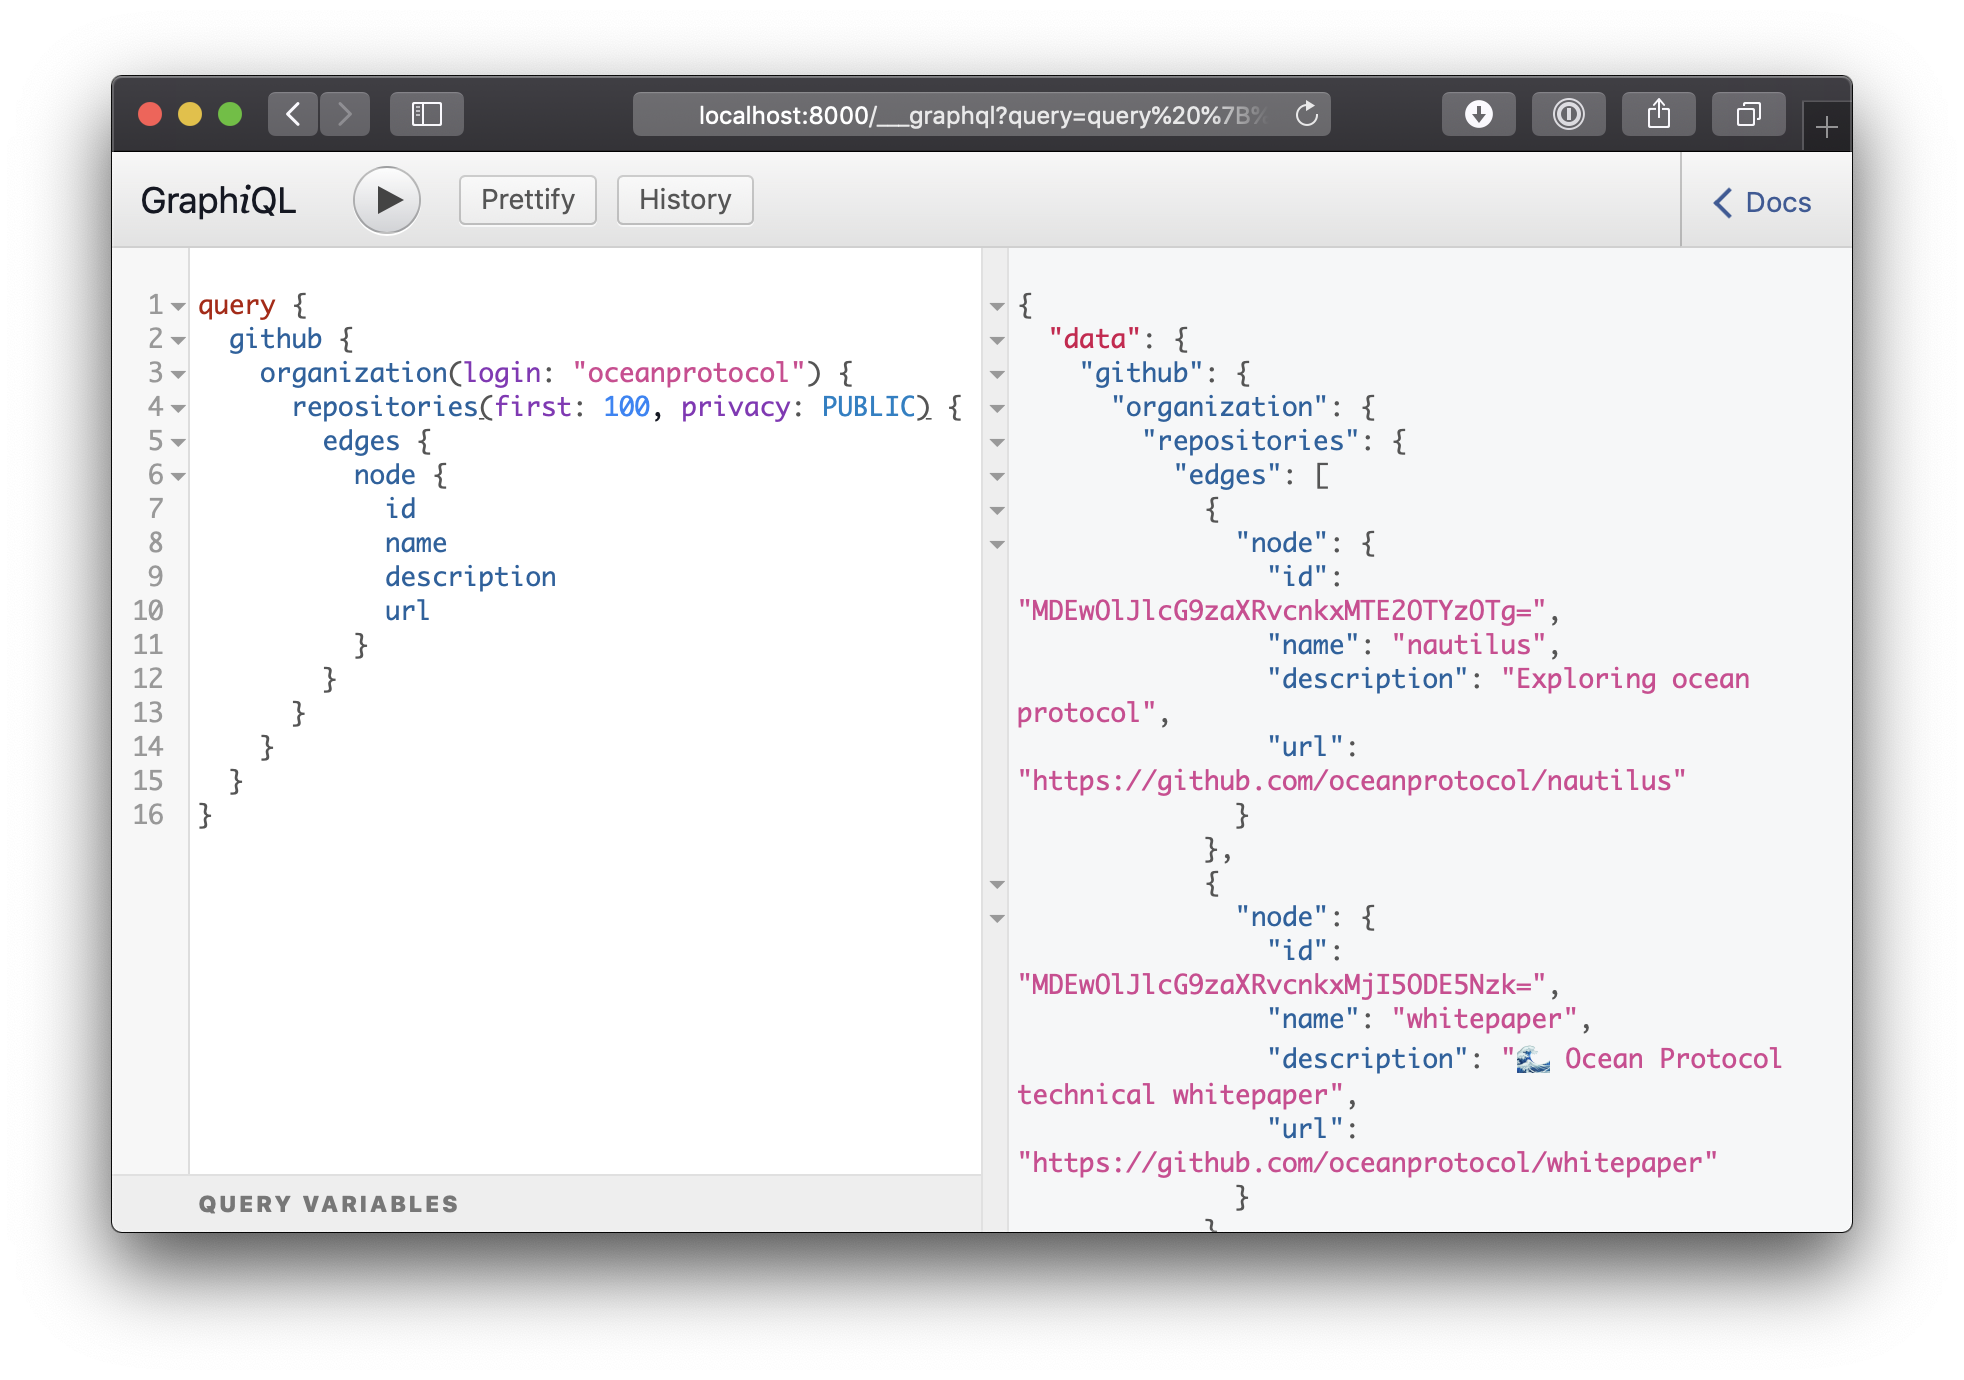
This query should get you started to explore what information you can get from GitHub. All that is described in GitHub GraphQL API can be used :
query {
  github {
    organization(login: "oceanprotocol") {
      repositories(first: 100) {
        edges {
          node {
            name
            description
            url
          }
        }
      }
    }
  }
}
GitHub REST API
The GitHub GraphQL API is only queried on build time, further GitHub updates on client side need to be done through additional fetch API calls. At the moment this is done for the repositories component, where the stars and forks numbers are updated on client-side.
We use github-projects for all communications with the GitHub REST API v3, deployed on Now.
This microservice should be used for all client-side integrations for performance and security reasons, required changes in data structure should be done over there. This service does data refetching automatically, caches results for 15min, and it has access to a secret GitHub token for making authorized API calls.
As a next step, using the REST API could be made obsolete by using some GraphQL client like Apollo to query GitHub's GraphQL API on run time too.
Deployment
Automatic deployments are triggered upon successful tests & builds on Travis:
- push to
masterinitiates a live deployment
-> docs.oceanprotocol.com - any Pull Request, and subsequent pushes to it, initiates a beta deployment
-> betadocs.oceanprotocol.com
The deploy command simply calls the scripts/deploy.sh script, syncing the contents of the public/ folder to S3:
npm run deploy
Requires authorization against AWS with one of the various ways, on Travis this is done with those environment variables:
AWS_ACCESS_KEY_IDAWS_SECRET_ACCESS_KEYAWS_DEFAULT_REGION


